Welcome to PlanToEarn

Tips For Online Earning And Graphics

What sells the most on Redbubble

What Sells the most on Redbubble

If you are a seller on Redbubble and want to know what sells the most on Redbubble, then you are at the right place. In this article, I will share some items which sell the most, and artists make more money selling these items, according to Redbubble.

Also, I have shared tips on increasing your sales, reaching more customers on Redbubble, and making a decent amount of money selling your artwork online.

What Sells Best On Redbubble.

Redbubble is a great platform for selling unique and creative products, such as t-shirts, mugs, phone cases, stickers, and more. It’s important to find what works best for you and your brand.

It’s been reported that Redbubble’s most popular products are t-shirts, stickers, and phone cases. These items are popular because they are versatile, customizable, and affordable.

Additionally, try to create unique designs that stand out from the competition. Make sure to include high-quality images, interesting fonts, and attractive colors to draw in buyers.

Finally, promote your products on your social media platforms and through word of mouth to get the most out of Redbubble.

What Should I Sell on Redbubble?

If you’re looking for unique products to sell on Redbubble, you should consider designing and selling custom apparel and accessories. You can use your own artwork, photos, or designs to create one-of-a-kind items that your customers won’t find anywhere else.

You can also create digital products like phone cases, laptop skins, mugs, and more. Check out Redbubble’s product page to better understand what you can create.

How to increase sales on Redbubble.

increase sales on Redbubble

Increasing sales on Redbubble can be a challenge, but several strategies can be used to boost your sales. First, make sure you have a clear and consistent branding strategy and that your designs are eye-catching.

You can also use targeted advertising to reach potential customers and build your brand. Additionally, consider joining forces with other Redbubble creators to help promote each other’s work.

Additionally, engaging with followers and potential customers on social media can help to create relationships and build trust. Finally, providing excellent customer service and promptly responding to customer feedback is important.

With a combination of these strategies, you can increase your sales on Redbubble.

How do you get noticed on Redbubble?

One of the best ways to get noticed on Redbubble is to create high-quality content that stands out from the crowd. Make sure to use an eye-catching design, an interesting title, and a detailed description of your work.

Also, make sure you share your work on social media platforms and engage with other users on the site. Finally, remember to be consistent with your work and keep creating new and engaging pieces.

Is Redbubble worth selling on?

Is Redbubble worth selling on

Redbubble is a great platform to consider selling your artwork on. It offers a wide range of products to choose from and allows you to customize your designs to fit your unique style.

Additionally, they offer excellent customer support and have an active and supportive community of artists. All in all, Redbubble is worth considering if you’re looking to start selling your artwork online.

what sells the most on Redbubble

FAQ (What sells the most on Redbubble)

What type of art sells best on Redbubble?

Phone cases, T-shirts, Mugs, and stickers are some of the most popular items that sell on Redbubble.

What site is better than Redbubble?

Sellfy is one of the best Redbubble alternatives. It allows you far greater control over your storefront as well as how you advertise and sell your print-on-demand items. Sellfy, unlike Redbubble, is not a marketplace.

Can Redbubble make you rich?

Redbubble will not make you rich, but it may help you make decent money from your artwork if you put in the time and effort. If you’re wondering if it’s worth it for you, I’d suggest the best way to find out is to submit some designs and see for yourself.

Conclusion

In this article, I have shared some of the items which sell the most on Redbubble. Also, I have shared some tips on how to reach more customers and how to increase your sales on Redbubble.

I hope this article helped you and answered all your queries. If you still have questions, you can ask me in the comments, and I will try my best to provide help and give you more and more important tips on how to make money on Redbubble.…

How To Group Elements In Canva

How To Group Elements In Canva

Grouping elements in a design tool will help you arrange the elements all together. If you want to apply the same task on multiple objects or elements, grouping them will greatly help you in this process.

In this article, I will show you how to group elements in Canva so you can perform multiple tasks on a group of elements or shapes simultaneously.

Group Elements In Canva (Quick Method)

You can select multiple objects or shapes and then group them by just holding the left click on your mouse and dragging on the elements you want to add to a group. After that, press Ctrl + G ( Command + G on Mac) on your keyboard, and all the selected elements will be added to a group.

Method 1: How To Group Elements In Canva Temporarily Using Mouse

How To Group Elements In Canva Temporarily Using Mouse

You can temporarily group elements to act on them all at once. Drag your mouse over the objects you wish to group. The selection boundary will be visible around the selected objects. Now on all the group elements, you can perform tasks of your choice like move, delete, etc.

This is one of the simplest methods for grouping items in Canva. The disadvantage of this method is that it selects all items inside the defined range (typically a square or a rectangle) you created by dragging your cursor and all the objects or elements.

Click anywhere outside of the chosen boxes to ungroup objects that have been selected using this approach. The selection boxes will vanish, and the items will function independently.

You can also read: How to animate text in Canva

Method 2: How To Group Elements In Canva Temporarily Using Keyboard

How To Group Elements In Canva Temporarily Using Keyboard

In this method, you can select and group different elements with the help of keyboard shortcuts. For this, select elements you want to add to a group by just clicking on them. After that, hold the shift button on the keyboard and select the other elements on the canvas by clicking on them. During the selection process, you must hold shifts to select different objects or elements.

This method will allow you to select multiple objects on your canvas without accidentally selecting the ones you don’t want to select and group.

To ungroup all the elements you have selected, just click anywhere on the canvas, and your temporary group will disappear, and all the elements and shapes will be free.

You can also read: How to upload fonts to Canva

Method 3: How To Group Elements In Canva Permanently

How To Group Elements In Canva Permanently

In the methods mentioned above, All the elements in the group will automatically be ungrouped as soon as you click outside the selection box, But if you want to keep the elements grouped no matter what you do outside the box. You can use the Canva permanent group feature to help you group the elements or shapes permanently.

For this purpose, first, select all the shapes and elements you want to add to a permanent group by following either the first or second method mentioned above. After selecting all the elements and shapes, simply click on the group button on the top toolbar of the Canva design page.

You can also just press Control + G ( Command + G on Mac) on your keyboard, which will help you easily group all the selected elements. After that, if you perform an action or a task on one of the elements in the group, it will automatically be applied to all the other elements present in that group.

Now, if you want to ungroup the elements, just select the group and click on the ungroup button on the top toolbar or press Control + Shift + G (Windows) or Command + Shift + G (Mac), and all the elements will be ungrouped automatically.

You can also read: How to remove background in Canva

How To Group Elements In Canva

Shortcuts For Grouping Elements On Windows And Mac

This is made easier by using the following keyboard shortcuts for Windows and Mac. First, select all the elements of your choice, and after that, press:

CTRL + G on Windows

CTRL + G on Mac

Also read: How to curve text in Canva

FAQs (How To Group Elements In Canva)

Can you group items in Canva mobile App?

Touch and hold the first object you want to group on the Canva Android and iPhone apps until you see the one element selected message. Tap on the other items that you’d like to add. In the pop-up message box, click the Done option.

Can you group edit on Canva?

There are several methods to invite your people to participate in designs using Canva for Teams. Using a team, a sharing link, design folders, or email, you can quickly have everyone working together in a method that works for them.

How do you select multiple things at once on Canva?

If you’re making a design with Canva, you might wish to select multiple elements at once. For this purpose, simply click on the first element you want to select, then hold Shift and click on the other elements on your canvas. This will allow you to choose many components on your design canvas simultaneously.

Conclusion

In this three easy methods guide, I have shared some ways to group and ungroup your elements and shapes in Canva. I hope you find it helpful, and also it solved all your queries regarding grouping and ungrouping in Canva.

If you still have any questions or find difficulties grouping your elements in Canva, then you can ask me in the comments, and I will help you solve all your problems.

Thanks For Reading!…

How To Make A Table In Canva

How To Make A Table In Canva – 3 Easy Methods

Tables are an important part of graphics. If you want to highlight some information, make an infographic, or create an empty printable table for your work on which people can fill the boxes with the information, you might need to use a table.

If you want to make a table for any of the above purposes or other purposes, then you might need to use Canva to make any kind of table according to your choice.

In this article, I will show you how to make a table in Canva by following simple and easy steps.

How To Make A Table In Canva ( Quick Method )

How To Make A Table In Canva

Log-In to canva and select the design dimensions of your choice. Now search for tables in the elements search bar. Select any table of your choice and remove the unwanted elements attached to it. Make changes according to your choice and download the table by clicking on the share button in the top right corner.

How To Make A Simple Table In Canva ( Step-By-Step )

This method will help you create a simple table in Canva for free. You just need to know about the basics of Canva and how it works, and you are done. Making a table in Canva will be as easy as it sounds if you follow the below-mentioned steps.

Step 1: Log In To Canva And Go To Elements Menu

Log In To Canva And Go To Elements Menu

Log-In to your Canva account and click on the elements menu on the left side of the design page.

Step 2: Search For Square In The Elements Menu

Search for square in the elements menu

Search for a square in the elements search bar and select the square of your choice. Click on the square and drag it to the design canvas. You can also change the color of the square from the top toolbar.

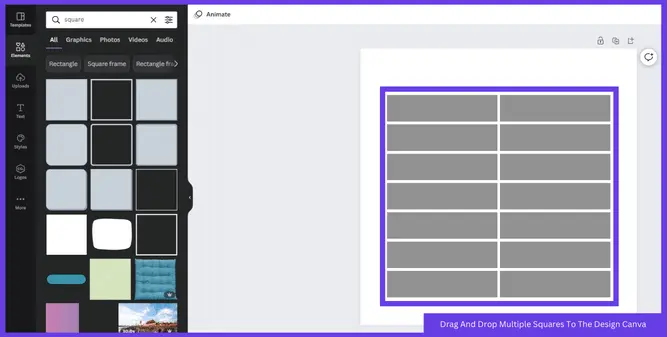
Step 3: Drag And Drop Multiple Squares To The Design Canva

Drag And Drop Multiple Squares To The Design Canva

Drag multiple squares to your design canvas until you are satisfied with the number of rows and columns you will make with all of these squares.

If you drag more squares than you need, simply select the extra squares and tap delete on the keyboard to get rid of these extra squares.

Step 4: Arrange All The Squares And Download The Table

Arrange All The Squares And Download The Table

Arrange all the squares to form a table. Adjust the sizes of the squares by the white handles which appear on the corners of the square when selected. Align all the squares to form a table, and ensure all the squares are the same color if you want your table to be in one color.

When you are satisfied with the table you created, now simply click on the share button in the top right corner and click on the download, adjust the settings and download the table you created.

Also Read: How to flip text in Canva

How To Make A Table In Canva With Lines ( Step-By-Step )

The second method of creating a table from scratch in Canva is using straight lines. When aligned well, a combination of many lines can form a table. The below steps will show you how to create a table in Canva using lines.

Step 1: Log In To Canva And Locate To Elements Menu

Log In To Canva And Locate To Elements Menu

Log-In to your Canva account and click on create a design. Select the dimensions of your choice. Now locate the elements menu on the Canva design page. You will see the elements menu on the left of the canva design page.

Step 2: Find A Straight Line In The Elements Menu

Find A Straight Line In The Elements Menu

Search for lines in the elements menu. Here you will see a list of lines, and you can choose any line. I recommend using simple straight lines to make a professional-looking table.

Step 3: Use Multiple Lines To Make A Table

Use Multiple Lines To Make A Table

Drag and drop as many lines as you want until your table is completed. You can also increase the weight of the line, or also you can increase the size of the line. It’s up to you to select the size and weight of your choice for your line to use in the table.

Step 4: Arrange All The Lines To Make A Table And Download It

Arrange All The Lines To Make A Table And Download It

Now arrange all the lines in the design canvas and make a table of your choice with these lines. Align the lines the way you want your table to look. You can add more lines in the canvas to increase the number of rows or columns in the table.

Also Read: How to curve text in Canva

How To Use Pre-Made Table In Canva ( Step-By-Step )

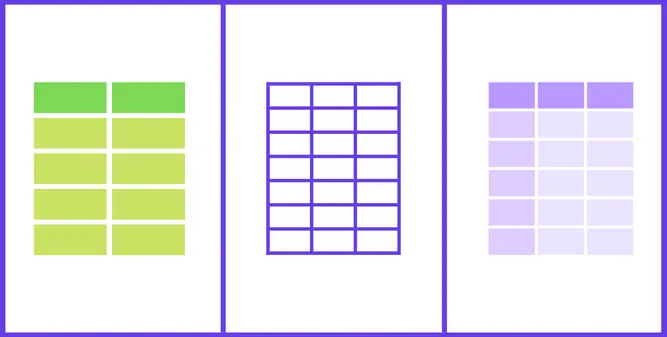
You can also use pre-made table templates in Canva. It will help you save time, and you will easily be able to complete your task. By this, you won’t need to use lines or shapes. Canva will provide free templates which you can edit and make into tables.

Step 1: Log In To Canva And Go To The Elements Menu

Log In To Canva And Go To The Elements Menu

Log-In to your Canva account and create a new design of your choice by clicking the “Create A Design” option on the top right corner. You can choose a specific dimension or create a custom dimension.

After that, click on the elements menu on the left side of the design page, and you will see a large variety of free and premium elements you can use in your designs.

Step 2: Search For Tables In The Elements Menu

Search For Tables In The Elements Menu

After locating the elements menu, now search for tables in the search bar of the elements menu, and a list of tables will appear. You will find different types of tables in the list.

Step 3: Select The Table Of Your Choice

Select The Table Of Your Choice

Select the table of your choice by just clicking on it, or you can also drag and drop it to the design canvas, and after that, you can make changes to the table.

Step 4: Make Changes According To Your Choice And Download It

Make Changes According To Your Choice And Download It

Modify the pre-made table design and make changes according to your requirements. Adjust the number of rows and columns, and make sure your table design is ready for download.

Click on the share button in the top right corner to download the table design. After clicking on the share button, simply click on the download and adjust the settings according to your choice. Now simply click on the download, and your table design will be downloaded to your device.

Also Read: How to create a YouTube thumbnail in Canva

How To Make A Table In Canva

FAQ(How To Make A Table In Canva)

How do you make a grid in Canva?

Click Elements from the editor’s side panel. Enter “grid” into the search bar. The grid options will be shown. To use a grid, click on it and drag it to the page.

Conclusion

Canva is a free-to-use graphic design tool by which you can create any type of simple graphic and use it anywhere you want.

In this article, I have shared three methods of creating a table in Canva. Follow these methods, and you can create a table of your own.

Thanks for reading!…

Best Cursive Fonts On Canva

15 Best Cursive Fonts On Canva

Canva is a great tool for small businesses and digital entrepreneurs to use its features to make some awesome designs for your brand. Canva sometimes provides so many design options; the hardest part is deciding which one to use!

This is especially true when it comes to font selection. There are many font options to choose from, especially if you have Canva Pro. Here I will show you some of the best cursive fonts on Canva that you can use in your designs.

The font industry has a tiny technical difference between the script and cursive fonts. Script fonts must be connected, although cursive fonts do not. In this article, I will show you different cursive fonts which you can use to give your design an attractive look.

What Is A Cursive Font

The Oxford Dictionary defines ‘cursive’ as “writing with the characters joined.” The font industry has a tiny technical difference between the script and cursive fonts. Script fonts must be connected, although cursive fonts do not always need to be joined.

Note: While most fonts are made by hand, cursive fonts – whether handwriting style, calligraphic, or brush-based – still seem like they were handwritten.

List Of Best Cursive Fonts On Canva

Here is a list of the 15 best cursive fonts you can use in Canva for free.

Apricots:

Apricots Font In Canva

Apricots are an easy-to-read script font with a trendy look. This font is best for Pinterest pins and other social media uses, but it may also be used in logos, marketing documents, and anywhere else.

Marck Script:

Marck Script Font In Canva

Marck Script is one of the most attractive handwritten cursive fonts in Canva because of the lovely swashes on the capital letters. Marck Script has a timeless appeal to it that draws attention.

Yellowtail:

Yellowtail Font In Canva

Yellowtail is a medium-weight flat brush script font with an old-school feel. Its blend of linking and non-connecting letterforms contributes to its unique style and readability. Yellowtail is inspired by classic 1930s fonts such as Gillies Gothic and Kaufmann but has the free visual rhythm of sign painter letters.

Pacifico:

Pacifico Font In Canva

Vernon Adams created Pacifico, an innovative and entertaining brush script handwriting font inspired by 1950s American surf culture, in 2011. In 2016, Jacques Le Bailly redesigned it at Baron von Fonthausen. Bojo Nikoltchev and Ani Petrova of Lettersoup extended it to Cyrillic in 2017.

Playlist Script:

Playlist Script Font In Canva

Playlist Script is a playful yet attractive handwritten font suitable for most designs. It is one of the most popular handwritten fonts in Canva. Playlist Script is the font equivalent of that classmate who gets straight A’s without opening a book, making elegance appear simple.

Limestone:

Limestone Script Font In Canva

Limestone is a thin, casual brush script with a dry brush texture created with a Tombow brush pen. It’s ideal for any project that requires a legible, handwritten look.

Niconne:

Niconne Script Font In Canva

Niconne is a lovely cursive font with swashes and unjoined letters. This gorgeous font is professional enough to be used as a wedding font.

Mervale Script:

Mervale Script Script Font In Canva

Mervale Script is a visually appealing free font that is fairly thick. Its elegant swashes pleasure the eye, and while it isn’t precisely “modern,” it also doesn’t seem ancient. Excellent for Pinterest, Instagram, and other social media platforms.

Genty:

Genty Script Font In Canva

Genty is a delicately made Delightful Bold on Script font. It creates a lot more enjoyment, trendiness, and vibrancy. Genty Fonts have a Versatile, Fun, Cute, and Beauty feel.

Genty is Designed with a variety of Opentype features. Elegant swashes, contextual alternates, style sets with up to 15 alternatives, ligatures, ascender and descender swashes, uppercase swashes, swoosh under the letters, swoosh at the end of the letters.

You may also like to read: How to animate text in Canva

Yesteryear:

Yesteryear Font In Canva

Yesteryear is a connected script font with a flat nib largely modeled on the title screen from the 1942 film “The Palm Beach Story.” It has a sharper feel than its source and is reminiscent of chrome inscriptions on old automobiles.

Majesty:

Majesty Font In Canva

Majesty is a smooth and beautiful incised serif font intended to offer a feeling of drama in any application. Though, Majesty’s austerity is eased by the natural familiarity of its letterforms.

The echoes of old stone inscriptions over the years are reflected within this 7-font type family, inspired by the traditional engraved type.

Bakerie Bold:

Bakerie Bold Font In Canva

I chose Bakerie Bold for this list, although I might have chosen Bakerie or Bakerie Thin. All three of these fonts are incredibly pleasing to the eye, with crisp and beautiful cursive characters that are gently rounded.

The Bakerie series is fantastic for a free font. This is a beautiful font for quotations and social media images.

Sarina:

Sarina Bold Font In Canva

Sarina is a display font with brush letterforms. Sarina’s medium contrast and broad setting provide a relaxed, breezy atmosphere. Sarina is suitable for medium to big sizes.

Amsterdam Three:

Amsterdam three Font In Canva

The Amsterdam Three Font is an excellent choice as a watermark on photographs, signature or signature logo designs, quotations, album covers, business cards, and various other creative projects.

Tangerine:

Tangerine Font In Canva

Tangerine is a calligraphic font influenced by several 16th and 17th-century italic chancery hands. Its tall ascender, the most distinctive feature of this font, uses a wide line spacing between lines to create an elegant texture.

You may also like to read: How to create gradient text in Canva

FAQ(Best Cursive Fonts On Canva)

What is a fancy font?

Fancy fonts are font families that provide an item with a more creative and aesthetic design. These fonts defy convention. They are intended to make a large impact, make a statement, and demonstrate inventiveness. Because the concept of a fancy font is so subjective, they can have a wide range of styles and patterns.

What font is similar to Futura in Canva?

Avenir, Helvetica, and Arial are some fonts similar to Futura that may be found on Canva.

What fonts do luxury brands use?

Geometric sans serifs are a common primary font choice, with 70% of the companies we looked at using them. Futura and Proxima Nova are more popular in the cosmetics industry than Gotham.

Conclusion

Canva is an amazing online tool anyone can use for graphic design purposes and basic video editing purposes. Many pre-made elements and designs of Canva make it the best tool online for the new designer and basic uses of graphic design.

In this article, I have shared a list of the 15 best cursive fonts you can use in your design if you use Canva free. There are many font options for you if you have a premium subscription to Canva. I just shared the 15 best cursive fonts; you can find much more on Canva.

Thanks for reading!…

How To Create Favicon In Canva

How To Create Favicon In Canva – ( 4 Easy Steps )

You might have wondered what the colorful logo is on the browser’s tabs. You might call it logo up to some extent, but it’s a favicon of that website you visit. It represents a website or brand and makes it easy for the user to identify the brand or the website.

So in this step-by-step guide, I will teach you how to create favicon in Canva for your website or brand. Follow this guide to solve all your queries regarding creating favicons in Canva.

Create Favicon In Canva – ( Quick Guide )

Create a new design with dimensions of 40 x 40 pixels (You can only create a design in 40 x 40 pixels canvas in Canva). Now create your favicon design or select one from pre-made Canva templates. Make the adjustments according to your needs. When you are done designing the favicon, now download it, and your favicon is ready to use.

How To Create Favicon In Canva – ( Step-By-Step Guide )

This Step-By-Step guide will help you create favicons in Canva for free. 

Step 1: Create A New Design In Canva

Create A New Design In Canva

Log-In to Canva and click on create a design. Select the custom design and put dimensions of 40 x 40 pixels. Canva does not allow creating a design of less than 40 x 40 pixels.

If you are using Canva, then you have to manage to make your favicon design in these dimensions.

Step 2: Design The Favicon According To Your Choice

Design The Favicon According To Your Choice

Design your favicon by using the Canva feature. You will find many pre-made elements and also a variety of texts and fonts which you can use in your design.

Simply search for the icons and shapes you want in the elements menu. Choose the elements according to your choice.

Step 3: Change The Color Of Texts And Elements

Change The Color Of Texts And Elements

Change the colors of the texts you use in the design and adjust the color of the elements and icons you use.

Remember, there are many icons and shapes on Canva whose color cannot be changed. Make all the little adjustments in your design and ensure it’s ready for download.

Also Read: How to Make a Branded Gif in Canva

Step 4: Download The Favicon In PNG Or JPG

Download The Favicon In PNG Or JPG

In the last step, download your design by clicking on the “Share” button in the top right corner. Now click on the “Download ‘option and select PNG or JPG format for your design.

Check the transparent background option in the download menu if you want your design to have a transparent background. After adjusting all the download settings, click on the download button, and your design will automatically start downloading.

how to create favicon in Canva

FAQ (How To Create Favicon In Canva)

What size is a favicon in Canva?

If you are creating a favicon in Canva, you must manage the design in 40×40 pixels because it is the minimum dimension of design you can create in Canva. After that, you can adjust the favicon size when using it on your website.

What size should a favicon be?

Favicon designs are small, at 16 pixels in height by 16 pixels in width, leaving little room for complex designs. Nonetheless, a decent favicon that is clean, simple, and easily recognized can serve as an excellent visual reference for users who are browsing your site over tabs or bookmarks.

Is a favicon the same as a logo?

A favicon is a small graphic that appears on desktop and mobile web browsers, browsing history, bookmark bars, and search results. Most firms utilize a tiny version of their logo as a favicon to boost brand awareness and exposure.

Conclusion

I hope this step-by-step guide helped you create a favicon in Canva for free. You can use Canva to make a custom favicon according to your choice to make it easy for the user to identify your website or brand.

If you have questions about creating a favicon in Canva, you can ask me in the comments sections, and I will help you in the process.…

How To Animate Text In Canva

How To Animate Text In Canva

You want to give life to your design by making your text animated and eye-catchy. Well, Canva made it simple for you. You can now animate text in Canva with a few simple steps. In this step-by-step guide, I will teach you how to animate text in Canva by following some simple and easy steps.

Animate Text In Canva – Quick Guide

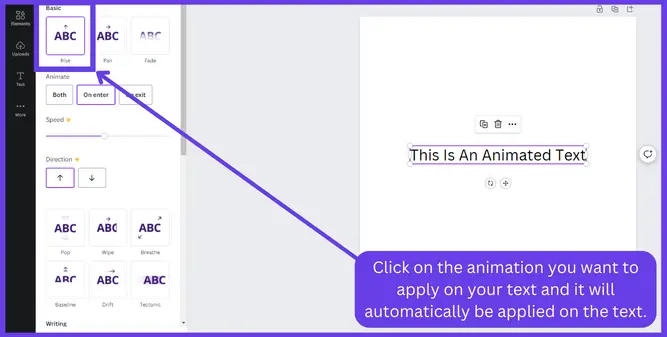
Create a text box and write your text. Now click on the text to select it and choose the “Animate” option on the top toolbar. A new menu will appear on the left of the design page with all the animation options. Click on the animation of your choice, and it will automatically be applied to your desired text.

How To Animate Text In Canva ( Step-By-Step Guide )

Follow these steps to add animations to text in Canva:

Step 1: Create A New Design In Canva

Create A New Design In Canva

To create a new design. First, log in to Canva and click on the “Create A Design” option in the top right corner. You can also select a pre-made template for your design if you want.

Step 2: Create A Text Box And Write Your Text

Create A Text Box And Write Your Text

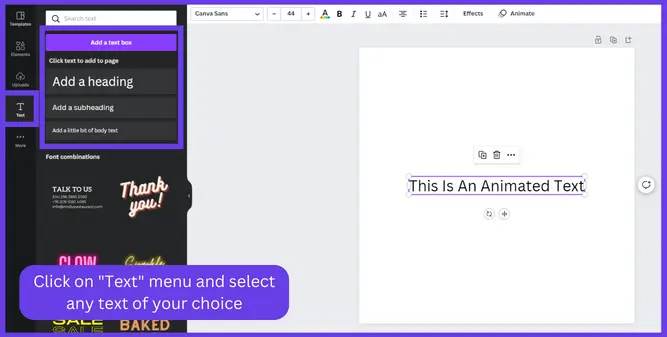
Create a new text box by clicking on the “Text” option on the left side menu of the design page. Here you will see options for texts in different sizes. Select the one you want to use by simply just clicking on it.

Now add your text to the textbox, and when you are done writing your text. Simply click outside the text box to deselect the text box.

Step 3: Select Your Text Box And Go To Animate Menu

Select Your Text Box And Go To Animate Menu

Add animation to your text by clicking on the text you want to animate and then clicking on the “Animate” option on the top toolbar. A new menu will appear on the left of the design page with many animation options you can apply to your text.

Step 4: Select The Animation You Want To Apply On Your Text

Select The Animation You Want To Apply On Your Text

Keeping your text selected, click on any of the animations of your choice to apply it to your design. By doing this, the animation will be automatically applied to your design.

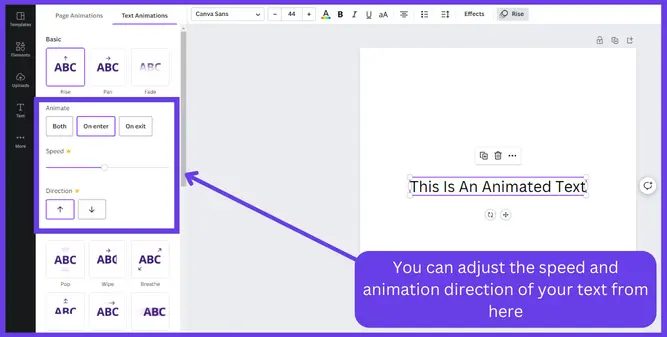
After clicking on any of the animations, a settings menu will appear under the animation, from where you can change the intensity and direction of your text.

How to animate text in Canva

Also Read: How to create gradient text in Canva.

How To Adjust Text Animation Timing In Canva

How To Adjust Text Animation Timing In Canva

You can adjust the animation’s timing from the clock option on the top toolbar. Simply click on the clock icon and adjust the time of your animation according to your choice. You can go with a minimum time of 1 second and a maximum time of 30 seconds.

How To Remove Animation From Text In Canva

How To Remove Animation From Text In Canva

If you didn’t like the animations you applied and want to remove them, you need to follow these steps:

  1. Simply click on the text you want to remove animation from.
  2. Click on the “Animation” option on the top toolbar. This time the name of the “Animation” option will be changed to the animation you applied before.
  3. After locating the animation menu, click the “Remove Animation” option on the bottom left of the Canva design page.

How To Make Text Appear One By One In Canva

How To Make Text Appear One By One In Canva

If you want your text to appear one by one in your design, Canva will also help you with that. Simple type your text and location into the “Animations” option on the top toolbar. Now go to “Writing” animations on the left menu.

Here you will see a list of options like Typewriter, Ascend, Shift, etc. Click on one of these animation options, and your text will appear one by one in your design. You can also change the “Intensity” and “Direction” of the animation. You can find these options under the animation you have selected.

Also Read: How To Flip Text In Canva.

FAQs ( How To Animate Text In Canva)

Can you animate text on Canva in a click?

Yes, you can animate text in Canva with a single click! This is a great method to add flair to your designs and is really simple. Simply choose the object to be animated and click the “Animate” button in the top toolbar.

How do you make text appear one by one in Canva?

Select your text and click on the “Animate” option on the top toolbar. Find the writing animation section on the left menu. Click on any animation in the writing section, and it will easily add one by one appearing animation to your text.

How do I animate an object in Canva?

Select the page or element to animate by clicking. Click Animate in the toolbar above the editor. The left side panel will provide animation choices. Choose an animation from the Page Animations tab to apply to your selected page.

Conclusion

I hope this article has solved all your queries about text animation in Canva. Canva provides multiple options for animating text completely for free with just one click. If you still have questions regarding text animation in Canva, you can ask me in the comments, and I will help you in the process.

Thanks For Reading!…

How To Draw A Line In Canva

How To Draw A Line In Canva

I want to make a design that will need a lot of lines to be used, and I don’t want to use any template from canva gallery or any elements. But that requires a lot of lines, and I have no idea how to draw a line in Canva.

As it turns out, there are two really simple methods for drawing lines in Canva, depending on how you want to achieve it. 

How To Draw A Line in Canva – Quick Guide

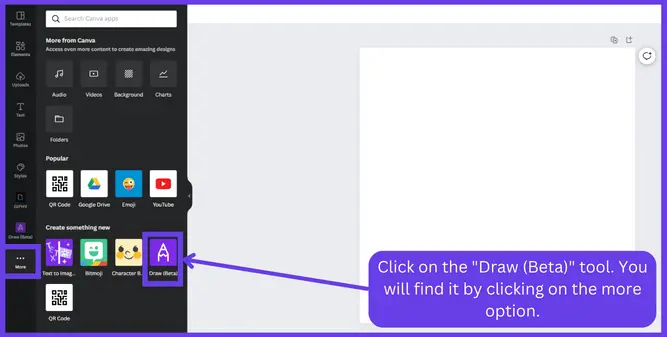
If you want to draw a line in Canva, You can use the “Draw beta” tool in Canva. You can find this tool by clicking on more on the left menu. Click on this tool, and then free-draw a line with your mouse. If you need a perfectly straight line, you can drag and drop pre-existing lines from Canva “Elements” library.

How to Draw A Straight Line in Canva (Step-By-Step)

You can follow this step-by-step guide if you want to draw perfectly straight lines to make a custom design in Canva but don’t know how to draw a line in Canva.

Step 1: Got To Elements Menu

Got To Elements Menu

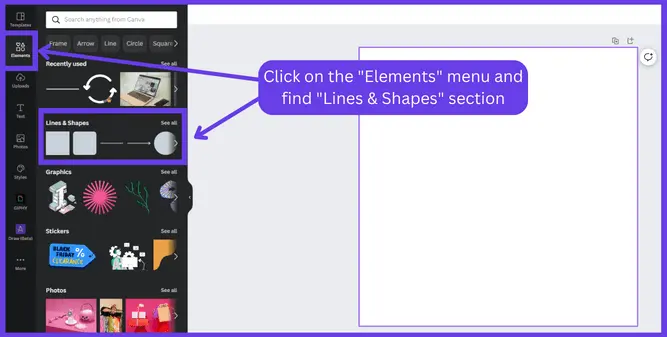
Click on the “Elements” menu on the left side of the Canva editor page. You will see different elements and shapes in the Canva elements menu.

Step 2: Expand Lines & Shapes Menu

Expand Lines & Shapes Menu

In the elements menu, locate the “Lines & Shapes” Section. Click on “See all” to expand the lines and shapes section. Or you can simply search for lines on the search bar.

Step 3: Drag And Drop The Line You Want

Drag And Drop The Line You Want

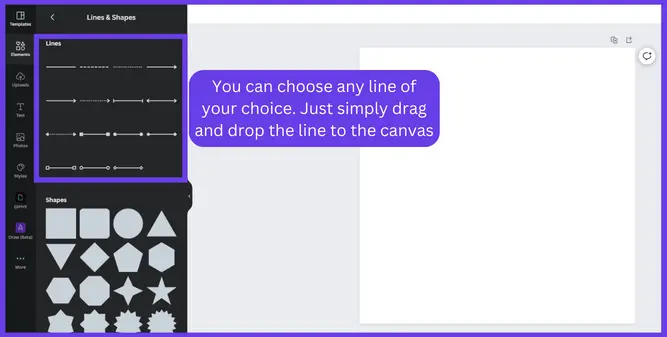
Find the line you want to use, and drag and drop this line to the canvas. You can drag more than one line if you want. You can also use different lines in your design at once.

Step 4: Adjust The Size And Thickness Or Thinness Of The Line

Adjust The Size And Thickness Or Thinness Of The Line

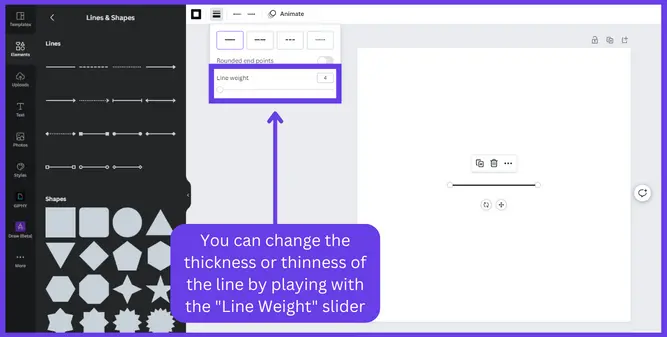
If you are satisfied with the default line, just leave it. But, if you want to make changes in your line, you can use the options on the top toolbar.

To make your line thick or thin, select the line and click the “Weight” button on the editor toolbar. Then drag the slider to adjust the thickness or thinness of the line.

If you want to add more effects to your line, you can change the line style by selecting the line style button on the editor toolbar. Click on the line style you want to use, and it will automatically be applied to your line.

Also Read: How To Upload Fonts To Canva

how to draw a line in Canva

Freehand Method of Drawing Lines in Canva (Step-By-Step)

Follow the steps below to draw a freehand line in Canva using the Draw tool.

Step 1: Click On The “Draw (Beta)” Tool On The Left Side Panel

Click On The _Draw (Beta)_ Tool On The Left Side Panel

If you want to draw a line using the mouse, you can use the “Draw (Beta)” tool. You can find this tool on the left-side menu on the editor page. 

If you haven’t already used the “Draw (Beta)” tool, you won’t be able to find it on the left menu. For this, click on more and scroll through the tools in the gallery until you see the Draw (Beta) app.

Step 2: Select The Brush And Marker Of You Choice

Select The Brush And Marker Of You Choice

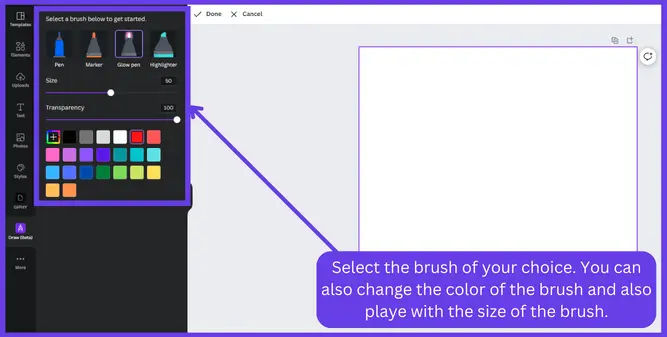
After clicking on the “Draw (Beta)” tool, you will see a menu of some brushes and markers. With these brushes and markers, you can make simple lines and shapes using your mouse.

Step 3: Draw A Line Using Your Mouse

Draw A Line Using Your Mouse

Select a brush of your choice and hold click on the canvas, and drag until you reach the desired length of the line you want. You can create multiple lines using this process.

Step 4: Erase The Line By The Eraser Tool

Erase The Line By The Eraser Tool

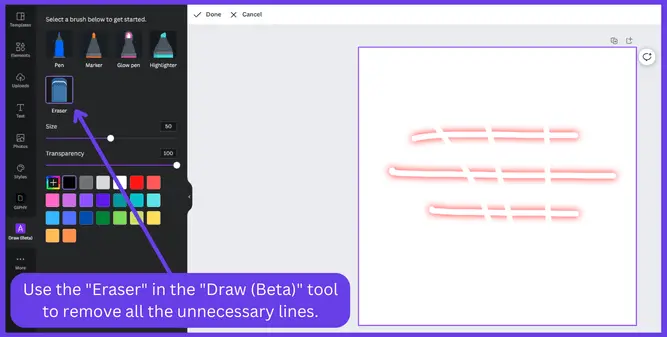
If you accidentally draw a wrong line, you can erase it using the “Eraser” in the Draw (Beta) tool. Simply select the eraser, now click and drag on the places you want to erase. Click on the done button on the top toolbar when you are done making lines.

Also Read: How To Curve Text In Canva

how to draw a line in Canva

How To Draw A Dotted Line In Canva

How To Draw A Dotted Line In Canva

You can find pre-made dotted lines in the “Lines & Shapes” section on the elements menu. But if you want to create your own dotted line, you have to first make a line of your desired length.

After that, select your line and click on the “Line Style” menu on the top toolbar. Click on the option you want to use, and it will automatically be applied to your line.

Also Read: How to change text color in Canva

FAQ (How To Draw A Line In Canva)

How to change the color of a line in Canva?

You can simply change the line’s color by clicking on the line to select it. Now click on the color tile on the top toolbar and select your favorite color from the left menu that appeared after clicking on the color tile. You can choose any color of your choice.

How to change the size of the line in Canva?

To change the size of the line, click on the line to select it, and you will see two handles appear on the endpoints of the line. Drag from these handles, and you will be able to change the size and direction of your line.

How do you animate lines in Canva?

To animate lines in Canva, simply select your line, and an “Animate” option will appear on the top toolbar. Click on it, and you will see a menu on the left of the design page with lots of animations. Click on one, and it will automatically be applied to your line.

Conclusion

To conclude, adding or drawing a line in Canva is simple and can be done in just a few simple steps. By following the instructions, you can make a line that is the perfect size and thickness for your project.

We have shared methods for drawing straight lines in Canva and the freehand method of drawing lines using Canva. You can follow the guide to understand how it works and how you can create lines for your own designs.…

How To Flip Text In Canva

How To Flip Text In Canva – 5 Easy Steps

If you are using Canva for the first time, then you might not be familiar with the flip feature in canva. It allows the user to flip any type of graphic, shape, text, and anything else. It allows flipping your element both horizontally and vertically.

So, in this step-by-step guide, I will show you how to flip text in Canva in 5 easy steps. You can also flip text in canva mobile app if you are a mobile user. I will also share ways to rotate text in canva or flip elements in canva.

Read till the end so you can use these features in your upcoming designs to make them stand out.

How To Flip Text In Canva

To flip text in canva, add a text box and write your text in it. Download the text as an .PNG file with transparent background. Upload the text back to canva, and drag and drop the text in the design canva. Click on the “Flip” option on the top toolbar. From here, you can flip your text both horizontally and vertically.

Flip Text In Canva ( Step-By-Step Guide )

Follow this step-by-step guide to flip your text in Canva.

Step 1: Create A Text Box And Write Your Text

Create A Text Box And Write Your Text

Create a new design in canva and make a text box by clicking on the “Text” option on the left menu. Here you will see different options and sizes, select one of your choice and write your text in it. Change the color of your text and adjust the size and line spaces.

Step 2: Download Your Text As PNG

After creating a text box and writing your text in it, Now click on the “Share” option in the top right corner. Here you will see a download option. Make sure you have selected the .PNG option and also checked on the “Transparent Background” option to download your text.

Download Your Text As PNG

You also have to make sure that your canvas has no background layer. Change the color of the text but not of the background layer. It is because we want our text with a transparent background. You can also remove the background in canva with the Canva “Background Remover Tool”.

Step 3: Upload The PNG Text To Canva Again

Upload The PNG Text To Canva Again

Now upload your text to Canva again in .PNG format. You can upload text images to canva by dragging your image to the canva page and dropping it in canva. Or click on the “Upload” option on the left menu and click on the “Upload Files” option, and from here, you can upload your text image.

Step 4: Add The PNG Text Image To Your Canvas

Add The PNG Text Image To Your Canvas

Now drag and drop the .PNG text image into your design canvas to further it and make it the way you like. Or you can just click on your uploaded image, which will automatically pop up on your canvas.

Step 5: Flip The Text Horizontally Or Vertically

Flip The Text Horizontally Or Vertically

Click on your text layer to select it. Now click on the flip option on the top toolbar. Here you will see two options. One for flipping text horizontally and one for flipping text vertically. You can click any of these, and your text will be flipped on the canvas.

How To Flip Text In Canva

How To Flip Text In Canva Mobile

You can flip your text in canva mobile app in some easy steps mentioned below:

Step 1: Create a text box and type your text in it.

Step 2: Download and Reupload your text in .PNG format with transparent background.

Step 3: Click on the text layer to select it.

Step 4: Now click on the flip option under designing canvas, and select the option of flipping horizontally or vertically.

Step 5: With these simple steps, you can flip text in canva mobile.

How To Flip Elements In Canva

Follow the steps to flip your element in canva:

Step 1: Place the element on the canvas and select it by clicking on it.

Step 2: Click on the flip option on the top toolbar of the design canvas.

Step 3: You can choose the option of horizontal flipping or vertical flipping according to your choice.

Step 4: With these simple steps, you can flip elements in canva.

How To Rotate Text In Canva

To rotate text in canva. First, select your text, and you will see a rotate option with two round arrows. Hold the rotate option and drag on the canvas to rotate your text according to your choice.

Once you are satisfied with the rotation of the text, release the rotate option, and you will find your text rotated according to your choice. You can rotate the text in canva with any angle of your choice.

FAQ (How To Flip Text In Canva)

How to wrap text in Canva?

The Text Wrap tool in Canva is a simple method to wrap text around an object. Select the Text Wrap tool from the left toolbar, then click and drag your mouse around the object you wish to wrap your text around.

How do I mirror a logo in Canva?

To mirror logos in Canva, choose the logo by clicking on it. Tap the “Flip” option on the top toolbar of the design page, and then select whether you want to flip the logo vertically or horizontally.

Why can’t I flip a shape in Canva?

Some shapes and graphics can’t be flipped with just one click. You have to download it in PNG format with a transparent background. Now reupload this graphic element and try to flip it again using the flip option on the top toolbar.

Conclusion

In this article, I have shared ways to flip text in canva. You can flip any type of text or image in canva with some simple steps. It is not as difficult as it sounds. Canva provides all the features you can use to flip your desired graphics, images, etc.

If you still find difficulties flipping text in canva, then you can ask me in the comments section, and I will help you in the process of flipping your text in canva just with a few clicks.…

How To Upload Fonts To Canva

How To Upload Fonts To Canva

Fonts can be a game changer when it comes to design. Canva is aware of this and provides free basic fonts for your designs. If Canva does not have a font that relates to your brand or personal style, you can upload a third-party font instead. Here I will teach you a step-by-step guide on how to upload fonts to Canva.

Can You Upload Fonts To Canva

Canva lets users upload their fonts to Canva to use in their designs. But the feature of uploading fonts to Canva is only available for Canva Pro Users. Canva pro has more benefits than a basic user. You will have a large variety of premium fonts that you can use in your design any time you want.

If you are a daily canva user, you just need to give a try to the canva pro version. Canva provides a trial of 30 days for its pro package.

How To Upload Fonts To Canva From PC (Step-By-Step Guide)

Step 1: Open Your Canva Home Page

Log In to your canva account if you are a canva pro user, and you will see the canva home page will appear. To upload your fonts to canva, you must purchase the canva pro plan.

Step 2: Click On Brand On The Left Menu

After reaching the canva home page, on the left side menu, click on “Brand”, and you will see a new window will appear. You have to keep in mind that this feature is only available for canva pro users.

If you are a free canva user, you must go with the default canva free fonts or buy the canva pro plan if you want.

Click On Brand On The Left Menu

Step 3: Click On Upload A Font And Select Your Font From the Computer

Click on the “Brand Font” option after scrolling down in the “Brand” menu. Click on “Upload A Font” and navigate to the folder where your font is saved. Your font format must be in TTF, OTF, or WOFF if you upload them to Canva.

After clicking on the fonts, a pop-up will appear where you have to confirm whether you own these fonts or have the right to use these fonts in your designs. Select “Ues Upload Anyway”.

Click On Upload A Font And Select Your Font From Computer

Step 4: Confirm The Uploading Process And Wait To Finish

The uploading process will not take more than 10 seconds. If you successfully upload your font to canva, you will see your font appear in the “Uploaded Fonts” menu.

Confirm The Uploading Process And Wait To Finish

If you are uploading your fonts in canva mobile app, these steps will also help there. You just have to make sure you have the file of the font you want on your mobile. This method can be applied to both android and IOS apps of canva.

how to upload fonts to Canva

You can also read about how to find the color palette of a photo in Canva.

Why Can’t I Upload Fonts to Canva

If you failed to upload your font to canva or find difficulties uploading your font, then these can be the reasons behind this problem.

  1. You don’t have the Canva Pro plan. If you want to upload your font to canva, you must buy the pro package of canva. Otherwise, you won’t be able to upload your font.
  2. Your font isn’t in the right format. To upload your font to canva, ensure your font file is in TTF, OTF, or WOFF format. Otherwise, you may find difficulties in uploading your font.
  3. The font you want to upload me not be licensed for embedding. Try uploading different font. I suggest you upload free licensed fonts.
  4. Your file font may be corrupt or broken if the issues continue.
  5. The maximum number of fonts that can be uploaded has been reached. Currently, each Brand Kit in Canva is limited to 500 fonts.

Also read: How to curve text in Canva – 6 Easy Steps

How To Use Canva Default Fonts

To use Canva default fonts, click on the “Text” option on the left menu and select your font size. Now select the text box, and you will see fonts in the top left corner beside the size adjustment option for fonts. 

Click on the fonts option, and a menu of free fonts will appear on the left side of the design page. Click on the font you want to use, keeping your text box selected, and your font will automatically be applied to your text.

FAQ (Upload Fonts To Canva)

Why can’t I upload my font to Canva?

Several reasons your font does not upload or causes issues when uploaded. What you can do for each is as follows:
1. The font file may be broken or corrupt. 
2. Verify that your font is in OTF, TTF, or WOFF format.
3. For embedding, the typeface needs to be licensed.

What is a brand kit in Canva?

Brand Kit allows you to create a brand from the start or utilize your current brand assets to ensure that every design is consistent with your brand. Once developed, you’ll have access to pre-set brand fonts, logos, colors, and brand templates varying from corporate design templates to create presentations.

What does the brand kit include?

A brand kit is a collection of various brand items for your brand. These include primary and secondary colors, primary and secondary fonts, and many logo versions that contribute to your organization’s visual identity.

Conclusion

Uploading fonts to canva is not as difficult as it sounds, but you have to put an eye on a few things and ensure that they are properly done. To upload a font from your computer to Canva, you must buy the Canva Pro plan. Otherwise, you cannot upload your font.

I hope this step-by-step guide helped you upload your font to canva. If you still have any queries regarding the uploading process, you can ask me in the comment section, and I will try my best to help you.…

How to Find the Color Palette of a Photo in Canva

How to Find the Color Palette of a Photo in Canva

You are a photographer or a graphic designer and want to find the color palette of a photo in Canva. Well, Canva is a place from which both designers and non-designers take advantage and use its free features and tools to make their designs stand out.

In this article, I will show you how to find the color palette of a photo in canva. Follow this guide to solve all your problems regarding canva color palettes.

Find the Color Palette of a Photo in Canva (Step-By-Step)

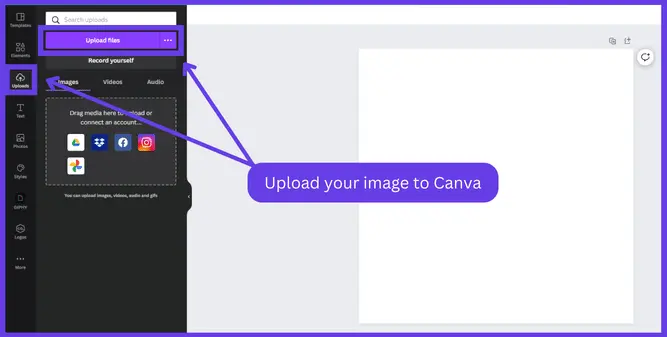
Step 1: Upload Your Image To Canva

Upload Your Image To Canva

Upload the image in which you want to find the color palettes. You can upload more than one image to canva. It’s your choice how many images you want to upload and how many color palettes you want to find.

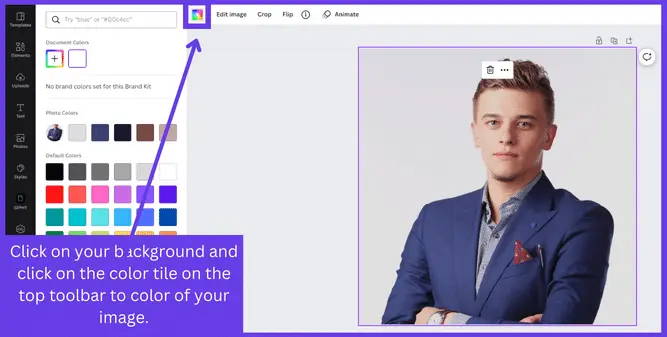
Step 2: Click On the Colors Option On Top Toolbar

Click On the Colors Option On Top Toolbar

After uploading your image, click on the image’s background to select it and then click on the color option. A new window will appear on the left of the canva design page. Here you will see color palettes generated from your image.

Step 3: Select The Color From The Appeared Color Palettes

Select The Color From The Appeared Color Palettes

Now you can apply this color to any of your elements or shapes with just one click. Select an element or shape and click on the color you want to add to your shape. You will see the color automatically appear on the element you have selected.

Find the Color Palette of a Photo in Canva

How do I find the color code of an image in Canva?

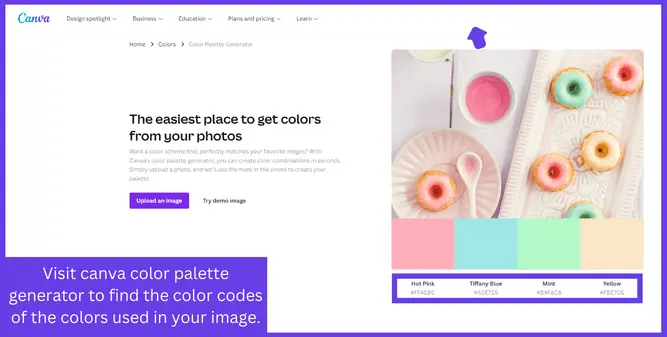
You can easily find the color code of your images in canva. You need to just upload your image to the canva color palette generator and wait for a few seconds. Canva will automatically show you the color palettes of your image.

You will also find more color palette generator tools online. You just need to upload your image, and the color palette generator tool will show you all the colors available in your image.

You can also read How to create a youtube thumbnail in Canva.

How do I find the color code of an image in Canva

What is the Canva Color Palette Generator

If you don’t know about the canva color palette generator, it is a tool that lets you create a color palette of your image in just one click. This tool will give you four color palettes of the image you upload to it.

Canva color palette generator is a free tool, and you can use it anytime. You can also use tools like ColorsCo and Adobe Colors to generate color palettes from your image in a few steps.

You may also want to read about how to outline an image in Canva.

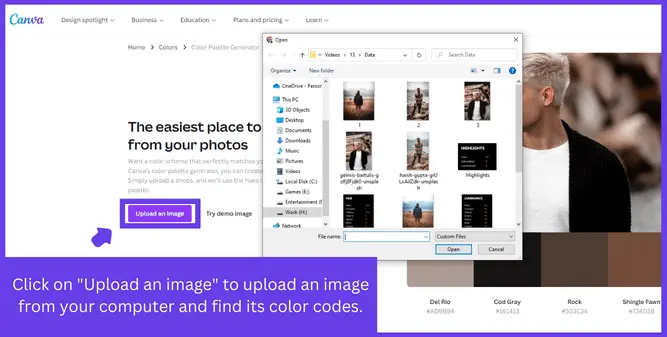
How to Use the Canva Color Palette Generator

You can find color palettes of your images with the canva color palette tool in just a few steps.

  1. Open the Canva color palette tool.
  2. Click on the “Upload An Image” option.
  3. Select your image from your computer.
  4. The color palette generator tool will automatically generate color palettes of your image.
How to Use the Canva Color Palette Generator

FAQ (Find the Color Palette of a Photo in Canva)

How do I use color codes in Canva?

When you’re in Canva and working with a design, click on the element you wish to change the color of, then click on the color icon on the upper left. Next, click the new color button and enter your HEX color code.

What is the color palette generator in Canva?

The color palette generator from Canva allows you to generate color combinations in seconds. Simply upload an image, and the color palette generator toll will generate your palette based on the colors in the image.

How do color palette generators work?

Some color palettes create random or uploaded palettes of similar or contrasting colors, but others allow users to lock in a few colors and find shades that match or contrast with those.

Conclusion

You have learned how to find the color palette of a photo in canva. You can use different tools online to generate color palettes for your image. In this article, I have shared a step-by-step guide on using canva to generate color palettes of your image.

If you have any questions regarding color palettes or generating color palettes, then you can ask me in the comments section.…